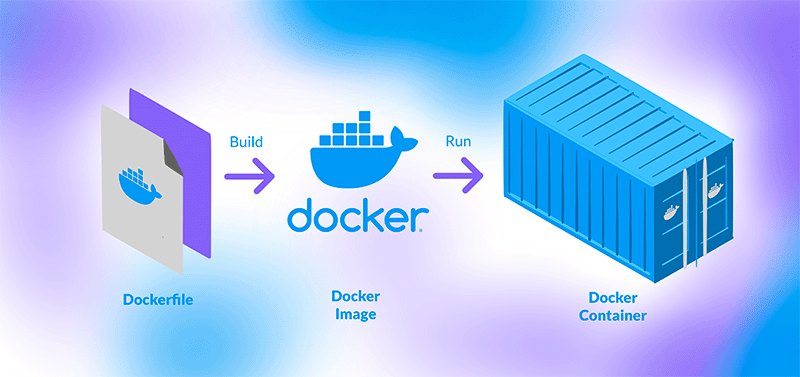
Docker学习总结

为什么要使用Docker?
如果你在团队协作时,总因开发、测试环境不一致导致 Bug 频发,那么你需要它!
如果你为应用部署到不同服务器时频繁出现兼容性问题而苦恼,那么你需要它!
如果你希望快速实现应用的迁移和备份,减少运维的繁琐操作,那么你需要它!
如果你想要隔离不同项目之间的运行环境,避免相互干扰,那么你需要它!
Docker基本组成
镜像 images : 可以理解为一个应用程序模板,通过模板创建容器
容器 container:提供应用服务的
仓库 repository:仓库就是存储镜像的地方
假如你是做月饼的,你需要去商店(仓库)购买月饼模具(镜像),然后使用不同的模具做出不同的月饼(容器),嘿,反正就这个意思咯。
Ubuntu、Debian都可以,服务器安装就不在这里说了。
Ubuntu虚拟机安装Docker
1、卸载旧版本
sudo apt remove docker docker-engine docker.io containerd runc
2、安装依赖包
sudo apt update
sudo apt install -y ca-certificates curl gnupg lsb-release
3、添加Docker官方GPG密钥
sudo mkdir -p /etc/apt/keyrings
curl -fsSL https://download.docker.com/linux/ubuntu/gpg | sudo gpg --dearmor -o /etc/apt/keyrings/docker.gpg
如果遇到报错,例如:
curl: (35) Recv failure: Connection reset by peer
gpg: no valid OpenPGP data found.

替换使用阿里云密钥地址
curl -fsSL https://mirrors.aliyun.com/docker-ce/linux/ubuntu/gpg | sudo gpg --dearmor -o   /etc/apt/keyrings/docker.gpg
4、添加仓库到系统源
echo \
  "deb [arch=$(dpkg --print-architecture) signed-by=/etc/apt/keyrings/docker.gpg]   https://download.docker.com/linux/ubuntu \
  $(lsb_release -cs) stable" | sudo tee /etc/apt/sources.list.d/docker.list > /dev/null
5、安装Docker引擎
# 更新包索引
sudo apt update
# 安装最新版Docker CE 核心引擎
sudo apt install -y docker-ce docker-ce-cli containerd.io docker-compose-plugin
6、启动Docker服务并验证
sudo systemctl start docker
# 设置开机自启
sudo systemctl enable docker
# hello-world验证
sudo docker run hello-world
# 安装成功
Hello from Docker!
This message shows that your installation appears to be working correctly.
7、配置国内镜像加速
如果在上一步使用hello-world 验证时因为网络问题无法拉取镜像,看这里。
sudo vi /etc/docker/daemon.json

# 输入下列内容,最后按ESC,输入 :wq! 保存退出。
# 道客
# 1Panel
# 耗子面板
{
    "registry-mirrors": [
        "https://docker.m.daocloud.io",
        "https://docker.1panel.live",
        "https://hub.rat.dev"
    ]
}
重启docker
sudo service docker restart
8、配置用户权限
默认情况下,Docker 命令需要 sudo 权限。若希望普通用户直接操作 Docker,可将用户添加到 docker 组:
# 将当前用户添加到 docker 组
sudo usermod -aG docker $USER

# 刷新权限(或重新登录)
newgrp docker

# 无需sudo直接运行
docker run hello-world
至此,能够不受网络限制而自由拉取镜像的Docker容器就部署成功了。
镜像管理命令
| 命令 | 说明 | 示例 |
|---|---|---|
docker pull 镜像名[:标签] | 从 Docker Hub 拉取镜像(默认 latest 标签) | docker pull mysql:8.0(拉取 MySQL 8.0 镜像) |
docker images [选项] | 列出本地镜像 -q:仅显示镜像 ID | docker images(查看所有本地镜像) |
docker rmi [选项] 镜像名/ID | 删除本地镜像 -f:强制删除(即使被容器依赖) | docker rmi nginx(删除 nginx 镜像) |
docker build -t 镜像名[:标签] 路径 | 基于 Dockerfile 构建镜像 | docker build -t my-ubuntu:v1 .(当前目录的 Dockerfile 构建镜像,命名为 my-ubuntu:v1) |
docker tag 原镜像名 新镜像名[:标签] | 为镜像打标签(用于推送或重命名) | docker tag my-ubuntu:v1 username/my-ubuntu:v1(准备推送到个人仓库) |
docker push 镜像名[:标签] | 将镜像推送到 Docker Hub(需先登录) | docker push username/my-ubuntu:v1 |
示例
chains@Chains-VMware:~$ clear
chains@Chains-VMware:~$ docker images
镜像的仓库      版本号     镜像唯一ID      镜像创建时间     镜像大小
REPOSITORY    TAG       IMAGE ID       CREATED        SIZE
mysql         latest    2c849dee4ca9   5 weeks ago    859MB
hello-world   latest    74cc54e27dc4   4 months ago   10.1kB
chains@Chains-VMware:~$ docker images --help
Usage:  docker images [OPTIONS] [REPOSITORY[:TAG]]

List images

Aliases:
  docker image ls, docker image list, docker images

Options:
  -a, --all             展示所有镜像
      --digests         Show digests  展示镜像内容唯一标识符
  -f, --filter filter   根据条件过滤镜像列表
      --format string   自定格式输出镜像
                        'table':            Print output in table format with column headers (default)
                        'table TEMPLATE':   Print output in table format using the given Go template
                        'json':             Print in JSON format
                        'TEMPLATE':         Print output using the given Go template.
                        Refer to https://docs.docker.com/go/formatting/ for more information about formatting  output with templates
      --no-trunc        不截断输出 更完整
  -q, --quiet           仅显示id
      --tree            List multi-platform images as a tree (EXPERIMENTAL)

chains@Chains-VMware:~$ docker rmi -f hello-world:latest
Untagged: hello-world:latest
Untagged: hello-world@sha256:dd01f97f252193ae3210da231b1dca0cffab4aadb3566692d6730bf93f123a48
Deleted: sha256:74cc54e27dc41bb10dc4b2226072d469509f2f22f1a3ce74f4a59661a1d44602
chains@Chains-VMware:~$ docker images
REPOSITORY   TAG       IMAGE ID       CREATED       SIZE
mysql        latest    2c849dee4ca9   5 weeks ago   859MB
容器运行的例子
MySQL
# 拉取镜像
docker pull library/mysql:8
运行命令
docker run -d \
  --name mysql8 \
  -p 3306:3306 \
  -e MYSQL_ROOT_PASSWORD=123456 \
  -v mysql-data:/var/lib/mysql \
  mysql:8